


In the last few weeks, I have sat down to write this post in many different places, including on a frigid bench in Banff, Alberta; at a campsite alongside the bugs in Moose Jaw; after a dip in Lake Superior; and during a power outage from Irene in Quebec city. Now, I start this post from a humble (with a capital “h”) hostel in the Mont-Royal area of Montreal. Hang on Jenny, didn’t you say that you were moving to Montreal? Doesn’t that mean you’ve found an apartment by now? Why yes, I have found an apartment near McGill that I am very excited about, but as it turns out we don’t take possession until September 1st, which happens to coincide with the first day of classes (fun fun!). Up until now, Sebastien and I packed up the van for a road trip across Canada, which lasted 6 days until we hit Ottawa, where we crashed with some family friends for a few nights. After Ottawa, we headed to Quebec City to see Sebastien’s relatives for a couple nights, and arrange a moving van and it’s contents for Sebastien’s Mom to deliver to Montreal. It’s been a great last couple of weeks, part vacation, part exhaustion, part unorganized, but all fun in the end.
Of course, this post was not finished from a hostel, because what can make you busier than a) moving and b) starting a new semester of university. Saying that I’ve “moved in” is a bit misleading, implying that everything is unpacked and in its proper new position. Of course, it is anticipated that it will take at least a week to reach that point. While Sebastien’s family in Quebec has been very helpful in providing us with lots of furniture, we are still lacking a desk, couch, pans, and approximately 50 other things we don’t notice we are missing until we attempt a new task. All this hefting furniture around, massive grocery shops, loads of laundry, and assembling of Ikea products has been conducted without air conditioning in a oh-so-humid atmosphere. It’s nice to have a little summer weather, but surely it could have cleared off for just a couple days…it’s enough to make me miss the cold of Vancouver Island!!
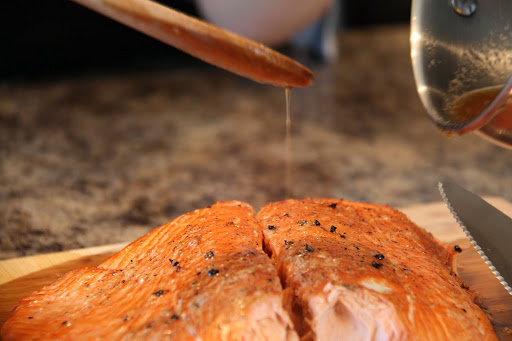
Speaking of Vancouver Island, nothing could be more different than where I am now. On the busy main street of Sherbrooke on the fourteenth floor of a large apartment building, it’s a far cry from my semi-below ground basement suite in Cadboro Bay. There’s a lot of food here, restaurants, bars, markets, and artisan shops. There’s lots of events and street performances going on all the time. People bike everywhere, that is when they are not on the metro. But, it is still a new, strange place that makes me both excited and nervous. This is hands-down the farthest I’ve ever lived from home, and I still am leaning towards some comforts that remind me of the coast. One dish I keep coming back to in my mind is my favourite salmon dish. I made it before I left, and am tempted to recreate it here even despite the lack of Sebastien-fished salmon. It’s a cedar plank salmon, rubbed with just garlic, salt, and pepper, then drizzled with a warm combination of maple syrup, whiskey, and butter. Simple, smokey, sweet, and rich, this is a perfect salmon recipe in my opinion. Serve it with lemon wedges and a side of local greens, this is the meal to bring the smells and sounds of the coast right back into your dining room.

First things first, lets talk about soaking the cedar plank. There are a few ways you can do this, but any which way takes time. It is recommended to soak planks for 2 hours-overnight. I have found that pouring boiling water over the plank and letting it soak for an hour works in a pinch, but it is easier to just submerge the plank in tap water for about 3 hours before you plan on cooking. In this recipe I just use plain water, which I poured over the planks on a cookie sheet, which were weighted down with mugs so they were fully submerged. If you have a large sink, it is easy to soak the planks straight in the sink. If you are wanting to try out something different, you can soak the plank in liquids other than water for a different smokey flavour. A water-apple cider vinegar combo with crushed cinnamon sticks would go very well with pork, a beer and bay combo is fantastic with ribs, and white wine and dill is a soaking variation that would go well with salmon. If you are wanting to use something other in water, keep in mind that you should avoid soaking in something with lots of sugar, as the sugar may burn and release a slightly unpleasant flavour. For your first non-water soak, maybe try consulting a cookbook or the internet for a reference!
 In this recipe I use spring salmon, which has a lighter taste than the famous sockeye. It is still a lovely fish, available in the spring (clearly). Of course, right now is sockeye season, my personal favourite, so I would recommend searching out some local sockeye from west coast fishermen!
Cedar-Plank Salmon
Keep in mind that the cedar plank needs to be soaked ahead of time. Untreated cedar planks are now regularly available at most grocery stores, but can also be purchased at hardware stores for the same purpose.
1 cedar plank
Individual salmon stakes or a filet of salmon (skin on)
~1 tsp granulated garlic
Salt + Pepper
Maple-Whiskey Sauce (recipe below)
1) Submerge the cedar plank in water for 2 hours-overnight. This can be done in your sink, in a tub (clean, clean tub), or on a cookie sheet with a lip.
2) Remove salmon from the fridge, and rinse it lightly with freshwater by running water over it under the tap. Place the salmon on a clean, dry plate. Check the salmon for any bones- if you feel any use pliers to firmly pull them out (watch especially for small pinbones). Pat salmon dry with some paper towel (for hygienic reasons, don’t use a cloth!).


3) Rub with granulated garlic, salt, and pepper. Don’t be shy with the salt- using a touch more than you normally would and it will really play nicely with the sweetness of the maple-whiskey sauce.


4) When you are ready to start cooking, preheat your BBQ. Get it nice and hot, then place the cedar plank on but don’t put the salmon on yet. The key to getting a real smokey flavour is to give the plank a chance to get a smolder going. To keep the smolder under control, keep a spray bottle nearby to extinguish any flames.

 5) Let the cedar plank heat up for about ten minutes, then place the salmon, skin side down if your using a filet, on the cedar plank. Now close the lid, so the smoke will be enclosed and permeate the salmon.
6) Let the salmon cook until it is flakes when touched by a fork, for a piece the size I used it took about 20 minutes in 375 degrees F BBQ temperature. If you like to use internal temperature to check for doneness, I like a nice rare salmon which is 120 degrees F in the thickest part. If you like a more well-done salmon, you could let it get to 130 degrees F internal temp without drying the salmon out, but anything hotter than that will be dry.

7) When you are certain the salmon is at your desired doneness, pull the plank off the grill, pull the salmon off the plank, and serve immediately!! Of course, with the maple-whiskey sauce and lemon wedges.

Maple-Whiskey Sauce
This sauce is easy to make, with a ration of 2:1 maple syrup to whiskey, and just a touch of butter to add a little creaminess. I’ve been making it for years, and never use a recipe, it’s so easy. You can keep this sauce warm on the stove while you are cooking the salmon, so prepare it ahead of time.
1/2 c Whiskey
1 c Maple Syrup (Use the real thing!! It won’t be any good with a substitute!)
1 Tbsp butter
optional: a dash of chili flakes
1) Combine all the ingredients in a small sauce pan, and bring to low boil, then reduce it to a simmer. Allow to simmer away until the volume decreases by approximately half and you can coat the back of a spoon with the mixture.

2) Keep the sauce warm until you are ready to serve the salmon. I like to drizzle a little sauce on the whole cut of salmon, then put the sauce in little pots around the table so people can add as much as they’d like to their own individual pieces.