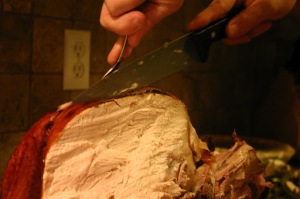
Thanksgiving, The Big One: Turkey


Now, everyone has their own way of making “the perfect” turkey. Brined, wrapped in cheesecloth, broken down, deep-fried, basted religiously…the list goes on. All steps are taken to get a juicy, moist, yet fully cooked bird. As a family we have tried it a few ways in the past, sometimes producing dry meat, but have settled on a very traditional method, that we will keep perfecting as the years go by. This year the meat was moist, the skin lovely and browned, and it didn’t take forever, so I’d say that’s pretty good! Though I was nervous about manning the turkey by myself, and a few minor freak outs did occur as I wavered the temperature up and down, it forgave me in the end and reminded me that following some rules is never a bad idea. I baste it regularly, admit to a pretty generous addition of butter, and leave it unstuffed. This is more of a method than a recipe, and I don’t provide a time. This is because every turkey is different, and I’ve never punched in a time that ends up being correct. If you do need a timer to remind you where you are, set it for a minimum amount, about two hours, and keep checking the temperature near the hip joint so you have an idea of where you are heading. When it gets close, you are going to want to bring the temperature up a bit to brown that skin, and you won’t know that you’re close if you don’t regularly check the temperature.

1) Take the turkey out an hour before you plan on cooking it to help get it to room temperature. While it’s hanging out (far from where the dog/cat/small children can reach it), you can prepare your veggies. We use:

– 4 carrots, chopped roughly
– 4 celery sticks, chopped roughly
– 4 onions, quartered
– 2 parsnips, chopped roughly
– 2 fennel bulbs, quartered

2) Arrange veggies in the bottom of your roasting pan, putting aside 2 onions worth of quarters to put in the turkey. As for the turkey, get out

– 1 c butter
– handful of fresh sage leaves
– handful of fresh thyme
– handful of fresh rosemary

Mash herbs in with half a cup of the butter. Put a small slit, just large enough for your hand to squeeze in, in the skin near the back opening of the turkey. Rub the herb butter inside the skin, pressing it all over the top into the front of the turkey. This will help keep the breast moist. Rub the other half-cup all over the skin, which will really help bring out a nice colour in it. Season the cavity with 1 Tbsp salt and place the rest of the onions inside. Tie the legs together firmly with a string. Cover the wingtips with tin foil, and loosely cover the legs with tin foil.

3) Heat the oven up to 325 degrees F. In the bottom of your roasting pan, pour in 4 cups of water and 2 cups of wine to help keep some moisture in the oven. Put turkey in the oven (finally!) with the lid off. Baste every hour after the first hour and a half. If the skin doesn’t seem to be browning, add a little extra butter when you baste.

4) When the leg meat near the hip joint reads 160 degrees F, its time to turn the heat up. 400 degrees F for about another 20-30 minutes, until the turkey temperature reads 170 degrees F in the same spot.

5) Remove the turkey! Place on a cutting board/platter to set for 20-30 minutes to let all those juices settle.

Thanksgiving, Take Three: Side Dishes.


Good side dishes really help make thanksgiving dinners memorable. The turkey, cranberry sauce, gravy, and pumpkin pie will probably be there year after year, so the different meals are often distinguished by the little things you change. Garlic mashed potatoes last year? Try potato gratin, twice baked, or fanned this year. Glazed carrots coming back regularly? Switch to green beans with almonds, roasted fennel, braised greens, or brussel sprouts. The one thing I tend to stay away from are cold salads- all the heat from the other dishes can wilt the lettuce, and it makes it harder to douse the whole situation in gravy. Here are a few sides we enjoyed this year!

Balsamic Brussel sprouts

Feared, hated, loved, spat out, and munched up. This is a vegetable of controversy, which is very understandable. Who wouldn’t be suspicious when they are so often boiled to death and left unseasoned? Inedible is a word that comes to mind when thinking of those flavourless mushballs. Here is a little method for more flavour than mush when it comes to your brussel sprouts, utilizing garlic, shallots, pancetta, balsamic and butter.

2 lbs brussel sprouts
1 ½ c diced pancetta, chopped
4 cloves garlic, chopped finely
1 shallot, chopped
2 tsp thyme
¼ c butter
¼ c balsamic vinegar

1) To prepare the brussel sprouts, wash them thoroughly in a large basin and pat dry. Cut off any stems that are long, and remove any rough, fibrous looking outer leaves. After the stems are trimmed, use a paring knife to cut a small “X” into the stem. This will help the stems cook faster so the leaves aren’t over done by the time the stem is ready.

2) Fit a steamer in the bottom of a pot with enough water to just cover the steamer. Bring to a simmer and add the sprouts. Cook until just tender and remove. Overcooking will mean mush, so keep an eye on it!

3) Meanwhile, in a small pan on medium-high heat fry up the chopped pancetta until it is darkened around the edges and has released some of its fat. Add the shallots and garlic, frying until just starting to brown, and then deglaze the pan with balsamic vinegar. Add the butter and thyme, stirring to melt and combine all the flavours.

4) Put the tender brussel sprouts into a dish, and pour over the pancetta balsamic mixture. Toss to coat. Season with salt and pepper, then serve as is!

Potato Gratin

Gratins can be done any which way you’d like- mushrooms, yams, parsnips, leeks, onions, shallots, garlic…whatever flavours your family is a fan of. So versatile and sooooo creamy, it is a perfect special occasion dish. How often do you get this much fat and flavour in your life? So good. OH, and salting in this dish is very important. I broke out the pink Himalayan salt in generous amounts to help everything pop.

1 Tbsp butter, plus additional butter for the dish
4 large yellow potatoes, peeled
1 leek, chopped (optional)
2 ½ c mushrooms, chopped (optional)
2 shallots, chopped (optional)
4 cloves garlic (optional)
½ c parmesan cheese, separated into three piles (feel free to substitute others!)
1 oz goat cheese (optional)
1 c cream
1 tsp sage
1 tsp thyme
zest of one lemon
Salt and pepper

1) For slicing the potatoes, using a food processor or mandolin will really help create very even, thin slices. If you don’t have either of those, definitely slice these potatoes the day before, because it will take a while! Don’t lose patience and make thick slices because those will take much longer to cook!

2) Prepare your “extras” to create a personal, flavourful filing. For us, that meant sautéing leeks until soft, then frying mushrooms with shallots and garlic.

3) Preheat oven to 350 degrees F and butter a 9 x 12 dish well. Layer the bottom of the dish with one layer of potatoes, overlapping edges slightly. Sprinkle with salt and pepper. Add half of your filling, ours being the mushroom mixture. Sprinkle with 1/3 of the cheese. Add another layer of potatoes. Sprinkle with salt and pepper, and then add the rest of your filling. Sprinkle with another 1/3 of the cheese. Add the rest of the potatoes in a final layer. Sprinkle with salt and pepper, and then add the remaining cheese. Dot the top with 1 Tbsp of butter and the goat cheese.

4) Stir lemon zest, sage, and thyme into the cream. Pour cream over the dish. The milk should come up to the bottom of the top layer; if it doe not, keep adding cream until it does.

5) This gratin is going to take about an hour in the oven. I kept mine foil covered for 40 minutes, then left it uncovered for the last twenty to brown and crisp up the top a little. Make sure the potatoes are cooked all the way through when you take it out!

6) Serve with an extra sprinkle of salt and pepper!

Thanksgiving, Take Two: Pumpkin Pie


What is thanksgiving dinner without some pumpkin in there somewhere? Silly, that’s what. Identified as the only pie my brother will eat, pumpkin pie is so easy to make and even easier to eat. Now, the debate: pumpkin puree from the can or cook and mash up the real stuff? Honestly, I’ve had it both ways and have some problems with both. Preparing your own pumpkin puree is a fair amount of work, and honestly, the pumpkins we buy weren’t designed for eating and end up with a bit of a watery flavour that is low on pumpkin-y-ness. Does it make you feel like a more accomplished person? Yes. Will picky brothers eat that kind? Doubtful. For this reason, we give the puree from our October pumpkins to the dog, who seems to find it just delicious. I have been using a canned organic pure pumpkin puree, and it is lovely and flavourful, so I am happy with it. Does it feel like a cop out? Yes. That aside, the taste makes up for the feeling of cheating!

Pumpkin Pie

This is a no frills, perfectly traditional pumpkin pie. I kept the spices low in this recipe, but in reality add about double what it says because I like a nice and spiced up pie. If you like it a little subtler with pure pumpkin taste, go with these amounts, taste, and adjust. These instructions use a food processor, so if you don’t have one that’s fine, just use a pastry blender or two knives to cut the butter in, then stir with a spatula as the ice water gets drizzled in.

Short-Crust Pastry

1 ¼ c all purpose flour
½ tsp salt
1 Tbsp white sugar
½ c frozen, unsalted butter cut into cubes
1/8- ¼ c ice water (melt ice cubes in the fridge to this amount of liquid, remove any extra ice pieces)

1) Place all dry ingredients in the food processor and whiz around to get them well mixed. Add the cubed, frozen butter and blitz a couple of time to get coarse pieces. They will continue to break apart a bit as you drizzle in the ice water, so be careful not to get pieces that are too small.

2) With the motor running, carefully drizzle the ice water in a small stream, stopping when the dough comes together into a ball and rolls around. This’ll be pretty obvious when it happens. Stop, even if the amount you added was less than what the recipe says. Trust the dough.

3) Press the dough together, and put onto a piece of plastic wrap. Push it out into a disk, and then wrap it completely in the plastic. Put it in the fridge for 30 mn. This is a good time to make the pumpkin filling.

4) Lightly flour a clean surface, and remove the disk from the fridge. Unwrap, and lightly flour the outside so it doesn’t stick too much. Roll it out with a rolling pin or bottle, pushing away from yourself and rotating a few degrees every stroke so it doesn’t stick. When the circle is about 13 inches (or eyeballed to roughly the size of your pie plate), transfer it to the pie plate by draping it over the rolling pin or bottle.

5) Once in the pie plate, push the dough over any thin spots or tears, evening it out. As for the edges: your choice. You can trim off the extra around the edge with a paring knife and use it to make decorative leaves and the like, or use a fork to create a border, or pinch the dough around your left index finger with your other index finger and thumb. Experiment!

6) Chill for another ten minutes to set your knew designs. Preheat oven to 375 degrees F.

7) Pour in the pumpkin mixture. Place on a baking sheet in case any drips happen, and slide into the oven. Bake 45-55 minutes, until crust begins to brown and filling seems to have set. A knife inserted into the center of the pie should come out almost clean.

8) You know how it goes- serve with whipped cream or ice cream at room temperature or chilled. Any leftovers for breakfast, I mean, in the fridge…

Pumpkin Filling

4 large egg yolks
2 c pumpkin puree
¾ c brown sugar
½ c heavy cream
1 tsp cinnamon
1 tsp ginger
1/8 tsp cloves
1/8 tsp nutmeg
½ tsp salt

1) Whisk together egg yolks, then add remaining. Smell, taste, and adjust seasonings to your liking.

2) Jump in at step 7 above.

Thanksgiving, Take One: Cranberry Sauce.


Once upon a time, there was a Canadian foodie who thought, “All I want to do is eat, and when I can eat, I am so happy, therefore I just want to thank everyone and everything.” And so thanksgiving was born.

The thanksgiving weekend has got to be one of the greatest food holidays, only slightly short of Christmas (Christmas also gets a fantastic breakfast, sooo…). Students flock home or to friends houses, families pull together, and pants get stretched. Butter and cream come out to play with sage and potatoes, and everyone turns into a true food hedonist for a night. I can’t get over how much I love it. This year it has come to happen that it is “my day” as my mom has fallen under the weather for a bit and my dad has been working on fixing up a house to sell with a buddy of his. This leaves me in the kitchen, with 15 pounds of turkey, a gratin, cranberry sauce, brussel sprouts, gravy, pumpkin pies, and tiramisu no-bake cheesecake (http://guiltykitchen.com/). As soon as I got home from uni on Saturday, I started chopping. When that got old, I started to bake. As that wrapped up, I moved to simmering, salting, and stuffing. It is now Sunday, and I have just gotten home from a hike with a fantastic smelling kitchen and everything ready to go in the oven at their specific time. Prepping the day before: sooooo nice. I thought I’d post some of the bits of turkey dinner I did in advance, then after I munch down on the rest of the meal, tell you how the rest of it turned out. Maybe it’ll be so good, everyone will start trusting their turkey dinners to 18 year olds…

Okay, first thanksgiving item to come together: cranberry sauce. I know that the canned variety is oh so popular, what with its unique ability to mimic its container perfectly, which creates endless hours of entertainment for children (rules are, you jiggle it as hard as you can without it losing its shape). As far as taste goes, though, I am partial to a homemade cranberry sauce. I mean, it is SO easy I don’t see why not! Stir some stuff together in a pot, forget about it, and voila, cranberry sauce that turns haters into lovers. I have always started with frozen cranberries for mine, mostly because the fresh cranberries I find at the local grocer are a little questionable, and you can get some lovely local ones in the freezer section. A little ginger and crushed red peppers add some warmth and depth to the cranberries, but if you want a pure, plain cranberry sauce, just leave those guys out. Another thing you may want to try is if you like orange zest in your cranberry sauce, I would stir that in about halfway through the cooking. I didn’t have any on hand, but that is a lovely variation.

Holiday Cranberry Sauce

The warmth in this sauce makes it absolutely dynamite. It always catches me a little bit off guard, which sends me diving in for another spoonful.

300 g cranberries (frozen)
1 ½ c sugar
1 ½ c boiling water
1/2 -1 tsp cinnamon
½- 2 tsp ground ginger
1/8-1/4 tsp red pepper flakes

1) Combine cranberries and boiling water in a small pot on the stove. Bring up to a boil. When just boiling, stir in the sugar. Bring back up to heat, then reduce to a simmer. Add the lesser amount of each spice (ex. ½ tsp cinnamon instead of the 1tsp etc).

2) Let simmer on the stove for about 30 minutes, stirring occasionally. Remember that it will firm up quite a bit when it cools, so cook it until the cranberries have broken down and the mixture is thick. I like mine pretty jelly-like, so I normally let it simmer away for closer to 45 minutes.

3) When you’ve reached your desired consistency, taste the jelly. If you find it too tart, add a little more sugar and keep it on the heat for a while longer to let it dissolve. If you want to taste a little more of any of the spices, increase to the greatest amount that I have listed, and re-taste. Feel free to add more, but be careful with that red pepper flakes!

4) Chill in the fridge overnight, and take out about an hour before you plan on serving it if you want to have it at room temperature.

5) Enjoy not just on turkey! Add to yogurt with a bit of orange zest, spread onto sandwiches, and dress up a lemon loaf.

University: "Bean there, done that."


Well, it finally has happened. First midterm in September! Oh wait, make that the first three midterms. And don’t worry; I’ve already had another one in October. I swear that all that rain going on when school started was a higher power reminding me that there is no time like the present to study myself to death. Already I’m in that semi-numb student state where your brain is split into segments and you are not sure that you can pull all the bits together. That is not to say that the semi-numb state has closed my eyes to the content of the courses I’m struggling with- there is some wicked stuff in them. Some cool science that has been in two out of four of my courses is the concept of artificial cells. No, not models of cells, but actually creating life out of parts, something that was done for the first time this past May by Craig Venter. Of course, he has already been accused of playing god and declared a threat to the world at large, which must mean that he has done something that is, in a single breathe, both groundbreaking and brilliant. Here’s a link to him presenting synthetic life, if you want to check it out:

http://www.youtube.com/watch?v=QHIocNOHd7A

With all this studying, the relationship between food, activity, and brainpower is becoming increasingly relevant. I am forever guilty of trading in jogging for sleeping, yoga for biology, and snacks for coffee with extra cream. Straying from what is ACTUALLY good for us is an inherent trait of 99% of the population, and when we find someone in that other 1% we eye them suspiciously and wonder what their problem is. This comes as a bit of a double standard when what I’m studying is telling me all about what is healthy for me (do this, eat that), and yet taking up just enough time to make it truly difficult to apply any of those orders. But ‘tis the life of a student, and those in health sciences, like myself, are no exceptions- there is an urban myth about one medical school student who figured out that if he ate beets, peanuts, and raw sugar all together for every meal, he could cover most of his biological bases, so that’s what he did. I love the raw sugar part- clearly he was at that point of exhaustion where the flip switches from “I shouldn’t eat that, it has too much sugar in it” to “I have six hours to go, which has more sugar in it?” which I experience via a London Fog at least once before every midterm.

Sugar sins aside, I have been reveling in cooking meals lately- a little too much. Every time I get a little too overwhelmed, I drop all and chop/bake/bubble away my anxieties. This disruptive and delicious hobby has to calm down, as the freezer is filling up faster than I’m eating. One appliance that has been assisting this obsession is, of course, the slow cooker. Other than consuming my time, it has been a saint. Fantastically convenient, it has also been letting me cook beans like a rockstar, which has been a great money saver. Health is more important than marks anyways, right? Right…

So far my favourite recipe that has come out of the slow cooker is a fantastic Mexican black bean soup. I ate it every day for a week, and never once groaned. THAT good. The recipe was more than just inspired by Smitten Kitchen (http://smittenkitchen.com/2010/01/black-bean-soup-toasted-cumin-seed-crema/), which is a fantastic blog with great pictures. I took this recipe word for word, and then added a few touches of my own (maybe she’s not a fan, but I know that for me, it isn’t Mexican if there isn’t cilantro!). So here it is, a dirt cheap, rib sticking, crazy luscious black bean soup!

BEST Black Bean Slow Cooker Soup

The name says it all. So easy, you just throw dry, unsoaked beans in a pot with all kinds of other yummy-ness, go away for a few hours, and come back to a very memorable meal. Make sure you serve this with classic Mexican extras- tortilla chips, avacado, fresh cut tomatoes, and a lovely little dollop of crème fraiche (substitute sour cream if you don’t have this handy- you’ll be happy either way).

1 Tbsp olive oil
1 large red onion, chopped
1 medium red bell pepper, chopped
1 medium green bell pepper, chopped
4 garlic cloves, chopped
1 Tbsp + 2 tsp cumin
1 ½ c dried black beans
1 tbsp chipotle puree **
7 c boiling water
¼ c fresh lime juice
2 tsp sea salt
¼ tsp black pepper
¼ c fresh cilantro, chopped

1) In a large pan, heat olive oil on medium heat. Add onions and peppers, sautéing them until onions get nice and translucent and the edges start to brown. Should take about ten minutes. Add garlic and cumin when you think the sautéing is just about done, and stir until nice and fragrant.

2) Transfer the whole mixture to a 6-quart slow cooker. Pour in beans, chipotles, and 7 cups of hot water.

3) Cover the slow cooker and set on high- I checked my beans at three hours and found that perfect, so start with three hours, then check. You may need to cook it another hour or two, depending on your slow cooker/beans.

4) When the beans are lovely and tender, turn the slow cooker to warm for serving, and stir in the limejuice, salt, and pepper. Taste, and if you find it could do with another cumin hit, throw a little more spice in to taste. If you plan on serving it right away, stir in the cilantro.

5) Transfer two cups of this finished soup into a blender (NOTE IF YOU HAVE A GLASS BLENDER: do not put in hot soup! It can crack! Cool down the soup first in a mini-ice bath, it shouldn’t take too long!). Blend until smooth. Stir back into the slow cooker.

6) Perfect! Add a little more salt if you think it needs it, and serve with crème fraiche, fresh chopped tomatoes, avocado, more cilantro, and a squirt of lime!

** I buy the chipotles in adobe sauce, and then just give them a whirl in the blender to make this puree.